Saturday 22 December 2012

Winter Solstice! 冬至。汤圆


Happy Winter Solstice! I am a bit late in posting this tang yuan (glutinous rice ball), reason being I was hesitating on what type of tang yuan should I made. Idea one, a traditional version-hmm...I have nothing to make the tang yuan become red. Idea two- the angry bird version, erm..not a bad idea since angry bird is also in round shape, but...tang yuan is so small and I have no tool to make the eyes, peak, etc..Idea three, a basketball or a football version? Isn't it cute when you see so many tiny basket ball or football in a bowl? But, how should I make it? Where should I start? I do not have a petite hand to make this small little cute thing, I will ruin the whole project...Then this idea four came across my mind, the marble effect tang yuan by using pumpkin. Yes, I made it!

I didn't measure the ingredients properly and therefore no recipe for this post. Please refer to the following blog if you are looking for a tang yuan recipe. These are some fabulous blogs.
my little favourite DIY
~Cass @ 揾到食
~Vivian Pang Kitchen
~Eat Your Heart Out
~ and many many more...


Thursday 20 December 2012

Pumpkin Kaya


This pumpkin kaya was made some time last month when I had some pumpkin left following Halloween. This pumpkin kaya caught my attention when I was googling for pumpkin recipe. I was surprised when I saw this recipes from All Recipes website. I am like, 'what? how come it appear in an English website'? When I asked my colleague or local friends, no one happens to know what kaya is and never tasted it before, no surprise as Kaya is a Malaysia traditional coconut jam. It is famous around Malaysia or south east Asia but not Europe. It brought my attention when I saw them featured on All Recipes website, and I wanted to try it!

This pumpkin kaya is suitable for vegetarian as it replaced eggs with pumpkin. For more information about what kaya is, please refer here. Eventhough it is slightly healthier than the traditional kaya and smells good, I still prefer the traditional one. This one smells good, but the traditional one (Pandan Kaya) is really really good!

Pumpkin Kaya
Recipe adapted from Pumpkin Kaya

Ingredients:
500g pumpkin, cubed
160ml coconut milk
80g brown sugar
4 medium screwpine leaves (Pandan leaves), tied into knot

Steps:
1) Steam pumpkin for about 20 minutes or until it is tender when pierced with knife.
2) Put the steamed pumpkin, coconut milk and brown sugar into a blender and blend until smooth. Pour the mixture into a stainless steel mixing bowl.
3) Fill a pot with about 1/3 water, bring it to a boil then turn to low heat. Place the mixing bowl into the pot, stir the mixture roughly every 5 minutes interval.(see here for double boiling method)
4) Continue to cook the mixture until the desired thickness achieved. Remove the mixture from hob and leave it to cool. Store in a dry, clean container once it is completely cooled and keep it in the fridge.
5) Pumpkin kaya is done!


Monday 10 December 2012

Kerabu Pelam (Mango Salad)


Ho Ho Ho~ winter is officially here and it will soon be christmas! Again, I am hoping for a white christmas this year. It snow between christmas day every year but not on the christmas day!

This pic was taken last Wednesday, the ground covered with layer of snow in the morning. Winter is officially here!
Saw this tasty dish from Mui's blog  the other day and decided to give it a try.This is a dish from Kedah, Malaysia. To be honest, I know nothing about food in the north east part of malaysia, be a Malaysian I am completely ashamed! Thanks to MFF (Malaysian Food Fest), I were more explored to the state food in Malaysia. This mango salad is really appetising and delicious, I can finished it in one go despite the burning lips and sweat. Since I couldn't get young mango, I replaced it with sweet ripe mango. I would love to try it with young mango one day. As in the photos, I didn't sliced or chopped the ingredients very fine, this give a slightly chewy and crunchy salad. The salad taste sweet, sour,  hot and spicy with the crunchy peanut and dried shrimp. Have a try if you like your salad in hot and spicy taste, it is really good!

After finished my first mango salad, I went to look for mango again in the supermarket the next day, was so happy when I got it. I thought I can remember the recipe and did not need to refer it, half way through preparing the salad, I found out I ran out of tomatoes, the sky is getting dark and I wouldn't want to go out with a pushchair in a dark cold night,  panicking! panicking! I was trying to think what can I use to replace tomatoes. First I thought of using pineapple, was asking myself would pineapple be a good combination to this salad? I doubted! As I walked out the kitchen and toward the fruit bowl in the living room, I saw those lovely kiwi fruits sitting in the packet unopened. Oh yes! I can try it with kiwi. I did, and I also add in extra peanut, it is equally good, I like it with kiwi too!

Kerabu Pelam (Mango Salad) (Adapted from My Little Favourite DIY)
Ingredients:
1 mango, shredded 
1 medium tomato, cut into small cubes (or 6 cherry tomato, halves)
2 shallots, sliced
2 bird's eye chilli, finely sliced
1 tbsp dried shrimps, soaked and drained
handful of peanut, dry fried, for garnish

Dressing sauce:
Juice from 1/2 lime
1 tbsp fish sauce
1/2 tbsp plum sauce

The ingredients and the sauce


Steps:
1) Dry fry peanut over low heat until fragrant or when you see the peanut oil appear on its skin.Skin when it is completely cool.
2) Add some oil to the pan, fry dried shrimp till brown and crispy, drained and set aside.
3) Add the dressing sauce into a small bowl and mix well.
4) Arrange all the prepared ingredients into a bowl, add in dressing sauce and toss well.
5) Serve.


This was my second attempt, with kiwi and more peanut.


Tuesday 4 December 2012

Mendiants 干果巧克力


This is another easy cookie recipe from the book,  法国经典甜点 La Patisserie Francaise Pour Tous. It is nutty and chocolatey and also great for various occasions or festive seasons!

Mendiants

Ingredients:
150g whole Hazelnuts
50g pistachios
30g golden raisin (I replaced it with dried apricot)
250g chocolate block

Steps:
1) Preheat oven at 180 degC.
2) Put hazelnuts and pistachios on a lined baking tray. Roast for about 8 minutes in the preheated oven. Remove and leave it to cool.
3) Break chocolate block into small pieces and place it into a bowl. Melt the chocolate over medium heat.
Lightly stir the chocolate mixture until all the chocolate pieces has melted. Remove from heat.
4) Spoon half a spoonful of of melted chocolate into the silicone cupcake mould, use the back of the spoon to smoothen the surface.
5) Put in roasted hazelnuts, pistachios and dried apricot according to your liking. Remove from mould when the chocolate is completely solidified.

6) Done. Mendiants are ready to eat!

Mendiants


*Note: 
Store the mendiants in a cool dry place as the chocolate melted easily.


Wednesday 21 November 2012

Congolais Ou Rochers Coco 刚果椰子球


My friend An Ting borrowed me some recipe books before she went to Malaysia for vacation with her hubby. I like the books that she borrowed me, with easy recipe and step by step instruction. The recipes from the book seems easy and the pictures are so nice that I ended up bookmarked so many of them, and now I wonder if I have so much time to try them out before I return the books to her....

Congolais Ou Rochers Coco (french) is an quick and easy baked coconut ball. It is similar to coconut macaroons except this recipe call for whole egg instead of just egg whites. It has a slightly crispy exterior with soft and chewy interior. These sweet coconut balls are great for any occasions, be it a tea time gathering or the coming festive seasons. It is also great to make it together with kids.


This is the book that I used to bake the coconut balls. 法国经典甜点 La Patisserie Francaise Pour Tous
Author: Francis Maes 法兰西斯。马耶斯 and 林凤美


Ingredients:

130g sugar
170g dessicated coconut
15g cake flour
2 eggs

Steps:

1) Preheat oven to 175 degC. Line a baking tray with baking paper. 
2) Put sugar and dessicated coconut into a mixing bowl, mix well.
3) Add in 2 eggs, mix well.
4) Add in cake flour, mix well.
5) Use a measuring spoon to scoop out a spoonful of the mixture, shape into a dome shape and place it on a baking tray. See pic below


6) Repeat Step 5) until all the mixture has used up. 
7) Put into oven and bake for 15 minutes. Remove and leave it to cool.
8) Done and ready to eat!


*Notes:
-Leave it to cool before storing it into a container. It can be stored up to 2 weeks.
-If you are living in a hot country with high humidity, the coconut balls would probably gone soft after few days, you can re-bake it in the oven for 10 minutes to remove the moisture, leave it to cool before eating. 

Saturday 17 November 2012

Recipe Books Gifted By A Friends


These books arrived to me on the Halloween day, I was so excited when I received it, I finally got some chinese recipe books. Living in an English speaking country, I couldn't find any chinese book shop here, and order online from Taiwan or Malaysia websites would cost me a fortune. It is not an option to order books from Taiwan or Malaysia as the charges and postage fee are higher than the book itself. I am thankful to Shirley who sent me these books, she has lightened up my day! Thank you!

Shirley is a good friend of mine when we were in Belfast. She is a kind and helpful young lady, and she is the one who will always be there when I am in need, be it a personal or work or health issues, she always try her best to help. As a thank you to her, I want to share her healthy weight loss story here. She started her weight lose plan about a year ago. Her plan was started with exercise and control eating. Jogging and aerobics for an hour and sometimes she will do weight training as well. She doesn't eat dinner or if she is hungry at the night time, fruits always be her choice. She kept her calorie under 800kcal per day for the first 4 consecutive months, and this had resulted her weight to drop from 11 stone to 9.5 stone. After that, she increased her calorie intake to 1000kcal, with daily exercise and 2 litre of lemon water. She also take vitamin B-complex daily to enhance the metabolism system. Now her weight has further reduced to 7.5 stone, that is in 11 months time! And she still wish to drop another half stone to complete her weight loss plan. I am amazed by the way she used to lose weight, without taking any commercial weight loss plan or pill, etc, it is au natural! Although it needs sometimes to achieve but it is au natural! I am also ashamed when I heard about her story, I always telling people I want to lose weight but never do it in action. I am very proud of her, she has got a very strong determination which has made her to achieve what she want today.

As stated in the picture, this photo was taken in February 2009.

Photo of Shirley, taken in Dec 2011 when she visited Belfast again, in her favourite shop Avoca
After 11 months effort............
This is she, my dearest friend Shirley! What a big change isn't it?

Wednesday 14 November 2012

Creamy Chicken Curry

I used to cook more curry dishes during winter, I need some comfort food to keep myself warm. We had a mild winter last year and I hope it would be the same this year. I hope and I hope...but it was already started to snow two weeks ago even though just for a day, and the weather is getting colder and colder these days, and it is only autumn now.... I am not particular like winter, besides shorter daylight, I tend to get sick during winter and I am coughing.

Ok, back to the topic today. I found this chicken curry recipe from Wendy's Table for 2.....or more. It is relatively easy to prepare, with easy available ingredient, I can get a yummy creamy chicken curry. I used to cook chicken curry by using paste. I always think cooking it from scratch need plenty of time to prepare, it actually not. Besides I always struggle to find those ingredients I need. Well, I am living in a small town with a small asian shop, not every ingredients are available here, sometimes need to wait for weeks or months for some ingredients to be back in stock. Wendy's recipe is quick and easy, please hop over to her blog for original recipe.

Creamy Chicken Curry


Recipe adapted from Table for 2...or more
Ingredients:
6-8 chicken thighs
1 tsp salt
4 large shallots, finely chopped
2-3 cloves garlic, finely chopped
3 lemon grass (4 inch from based, lightly smashed)
50g chicken curry powder
1 tsp of hot curry powder
200ml thick coconut milk
12 small new potatoes
10 tofu puffs
Salt for seasoning

Steps:
1) Wash the chicken thighs, trim of excess fat and cut into smaller pieces, marinate with 1 tsp of salt, leave it for 30 minutes.
2) Heat up oil in a pot, put in chopped garlic and shallots, fry until fragrant.
3) Add in chicken curry powder and curry powder, fry until fragrant. Toss in lemon grass.
4) Put in chicken and fry for 4-5 minutes. Add water to the pot, just sufficient to cover the chicken. Bring to boil.
5) Put in potatoes and tofu puffs, cook for 5 minutes. Cover the pot with lid and continue to cook with low heat until potatoes are tender.
6) Add in coconut milk and season with salt.
7) Dish up and serve.


Thursday 8 November 2012

Pandan Kaya (Coconut Jam)

I had been wanting to make my own kaya for so long but the cooking and stirring time always put me off. I can't really find a good kaya in the asian supermarket here, they are either too sweet or lack of ''fragrant'' (one should know what I mean if you are a kaya lover). I am glad I found this easy kaya recipe while reading Sonia's blog. She used the double boiling method instead of cooking it in the pot from low heat. There is no long standing, cooking and stirring, you just need to give it a light stir about every 5 minutes until you get the desired thickness. Well, no long standing or cooking means you do not need to stand in front of the hob to keep stirring it for 2 hours to avoid any lumps and burn, however, you do need about an hour to get to the desired thickness. Since you only need to stir it for about  every 5 minutes, you spare some time to do other tasks e.g. to wash dishes, cutting or chopping vege, preparing meal, etc. I like this method, it is easy and still produce a smooth and tasty kaya. You can spread it on toast or as a filling for cake or bun or pau etc, I prefer it on toast with butter. Ops, I should have taken a picture of how I make my kaya on toast!

See what I have got here...

Pandan Kaya (Coconut Jam)
Recipe adapted from Nasi Lemak Lover

Ingredients:
3 large eggs
250g sugar
350ml coconut milk
4 pandan leaves (screwpine leaves)

Steps:
1) Pandan Juice:- Cut pandan leaves into small pieces. Put it into blender with coconut milk, blend well. Strain and discard pulp.
2) In a mixing bowl, put in eggs and lightly beat with a fork. Add in sugar, lightly stir till sugar dissolves.
3) Add Step 1) into 2). Mix well and strain the mixture into a stainless steel mixing bowl.
4) Fill a pot with about 1/3 water, bring it to a boil then turn to low heat. Place the mixing bowl into the bowl of boiling water (see here), stir kaya mixture once every 5 minutes (roughly)
5) Continue to cook it until the desired thickness achieved. Remove the mixture from hob and leave it to cool. That's it, kaya is done!
6) Store the cooled kaya into container and keep it in the fridge.


*Notes:
-Strain the mixture to prevent any lumps and to produce a smoother mixture.
- Stainless steel or high heat resistant bowl is preferable as you need to cook the mixture over boiling water for some time until the desired thickness of kaya achieved.
- The shelf life of kaya varies on the weather and humidity. I store them in 2 small jar, one keep in the fridge and the other at room temperature. I finished the room temperature kaya in a week and it was still good when I finished it. The kaya in the fridge can be kept for ~2weeks. It is recommended not to make the kaya in bulk and finish it as earlier as possible to enjoy its freshness and fragrance.


Wednesday 31 October 2012

Trick or treats? Jelly Hard Boiled Eggs

There has been some days since I last updated my blog, hardly find some spare time out for myself. I normally update my blog prior to the end of the day, after putting my little precious to bed and after all the housework done, I get some peace at this time which enable me to have some 'me' time. The little precious has not been sleeping well recently, he has been waking up after an hour or two after I put him into bed, maybe teething or maybe weather is getting cold and the bed is not cosy enough, I am not sure, just hope the condition will change.

I had been collecting egg shells recently, I was going to make some jelly hard boiled eggs by using egg shells. This idea was inspired by Wendy from her Mango Yogurt Mousse which were made using egg shells. Reading at her recipe, I recall my mum used to make jelly eggs with palm sugar when we were small and we love it so much. I enjoy cracking and peeling off the egg shells, and I get cold jelly instead of hard boiled eggs after peeling off the shell. As a kid, I think this was special compare to the boring jelly block. Mum had stopped making it after we had grown up, and it was my turn to make it. Instead of making the whole jelly eggs, I decided to make a half jelly eggs so it looks like a hard boiled egg that cut into half. As a mark of Halloween's today, I have used pumpkin as the jelly yolks and coconut milk as the jelly egg whites.

Happy Halloween!


Ingredients: (for 10 eggs)

For the jelly egg yolk,
100g pumpkin puree
80ml water
10g vege gel (or 1 teaspoon agar agar powder, I can't find agar agar powder here)
10g cane sugar

Steps:
1) Wash the pumpkin, cut into small cubes. Steam for around 15-20 minutes or until the pumpkin is soft when pierced with a knife/fork. Puree the pumpkin with a blender.
2) In a mixing bowl, put in water, vege gel and cane sugar, stir till the vege gel and cane sugar dissolved. Add in mashed pumpkin and mix well.
3) Bring the mixture to a boil over low heat, turn off the heat and pour the mixture to a container to about 1cm height. Put it into the fridge to set once it is cooled.
4) Remove the jelly egg yolk from the fridge after it is set. Use a small round cutter to cut it into round shape as what you see the real yolk when you cut the hard boiled egg into half. I didn't have any round cutter so I use a measuring spoon (1 teaspoon) to cut it into shape. (see below) Set aside.
*Note: Instead of using food colouring, I use cane sugar to add colour to the pumpkin.

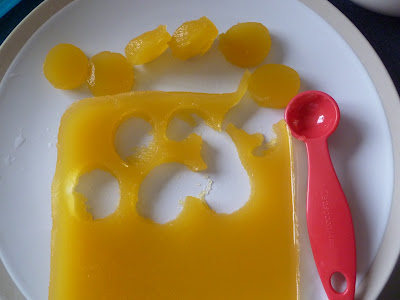
use measuring spoon to cut into round shape


For the jelly egg white,
100ml water
150ml coconut milk
50ml fresh milk
65g caster sugar
15g vege gel (or 2 teaspoon agar agar powder)

Steps:
1) Put all the ingredients for the jelly egg white into a mixing bowl and mix well.
2) Bring the mixture to a boil over low heat, turn off the heat. Pour the mixture into a measuring jug.

To Assemble:
1) Place the prepared egg shells on a egg tray.
2) Pour some jelly eggs white mixture into each egg shells. Leave about 5 minutes or until it is nearly set (depends on the weather condition)
3) Put the jelly egg yolk into each shell, pour the remaining jelly egg white mixture into each egg shell.
4) Leave it cool and put it into the fridge to set. Done!

I am submitting this post to Aspiring Bakers #24 (October 2012): Jellies & Puddings  hosted by Charmaine of MiMi Bakery House

Tuesday 23 October 2012

Basic Sponge Cake


I consider myself as Ok for cooking but really Not Ok in baking, I rarely bake successfully in first attempt even just for the easy one. Part of the reason may be due to my ''agak-agak'' (roughly estimate) habit which I am so use to when doing cooking, I know I can't do it the same way in baking but I just find it hard to avoid sometimes. Another reason maybe due to my impatience attitude, lack of baking knowledge and didn't do much research before trying something new. Looking at one's recipe seem easy but trying to implement seems a bit tricky.

I found this basic sponge cake recipe from Sonia's blog. I was so excited as I finally found a cake recipe that doesn't require eggs separation. The original recipe is from foodhouse 8 in youtube, I watched the video in youtube and it seems easy to make it, however I still failed for the first attempt even with the guidance from video demo, how hopeless am I.... :(

At the beginning of my first attempt, I was so excited  when seeing the cake rose nicely in the oven, I thought I got it right for the first time. However, the middle of the cake shrink during the cooling process, and my heart also shrink at the time I saw it--> Again, I have Failed..

First attempt- Failed product


I decided to try it for second time. It was a success for my second attempt and I am happy I finally did it. The cake turn out so soft, fluffy, spongy and moist. I have got the texture I want. And I will definitely make it again.


Basic Sponge Cake
Recipe adapted from Nasi Lemak Lover and Foodhouse 8 (youtube)

Ingredients:

6 medium eggs
2 egg yolks
135g sugar
21g glucose
1g salt
32g cooking oil (or corn oil)
21g hot chocolate powder (or cocoa powder)
106g cake flour
1g baking Soda
21ml milk

Steps:
1) Heat up cooking oil in microwave for about 40 seconds, remove, add in hot chocolate powder and mix well, set aside.
2) In a mixing bowl, add in whole eggs, egg yolks, sugar and salt, beat on a high speed till foamy or pale yellow.
3) Add in glucose and continue to beat on medium speed until batter double in volume and reach ribbon-like stage.
4) Sift in cake flour and baking soda, beat on low speed till mix well.
5) With a spatula, take 1/3 of the batter and mix it with step 1), fold in the mixture with the remaining batter, mix well.
6) Add in milk and mix well.
7) Pour batter into in round baking pan (I use 21cm x 21cm square pan) and bake in a preheated oven for about 50 mins at 170 degC or until cooked.
8) Remove from oven and invert the pan immediately on a cooling rack. Leave it to cool completely before unmould.


Wednesday 17 October 2012

Strange Foam Covering Aberdeen Beach

Weather has been worst recently, it happen around this time every year, this stormy weather has resulted in traffic chaos, some trees toppling, roof damaged, etc. This year we encounter some strange white froth  covering Aberdeen beach for a number of days, it was believe to be caused by the high winds that sweep the foam from the North Sea. I couldn't believe the strange foam that cover Aberdeen beach until I saw it with my naked eye over the weekend. This is also the first time that I saw such a high volume of high waves, the whole beach become so dirty and scary.


and here are the video


Friday 12 October 2012

Kuih Ketayap (Crepe with Coconut Filling)


I was so happy when I saw this kuih recipe the other day, I just can't wait to give it a try. This is one of the kuih that my mom used to buy for us for breakfast when we were young, I always call it the 'green kuih'. I never knew its name until I found this recipe in Gert's blog, actually I should say I only came to know those kuih's name when I found Gert's blog. When I was small, I gave 'nickname' to those kuih when I didn't know the exact name of the kuih. Apart from this kuih, I also called Kuih Keria (Sweet potato donut) as gu chia lian (Roda kereta lembu in hokkien), Ondeh-ondeh as O' nek nek, Apam Balik as abang adik, and many many more. Sometimes my friends just don't understand what I am trying to tell until I show them the picture.
This kuih consider easy to make compare to others as only few ingredients needed and easy steps. The recipe is adapted from Kuih Ketayap/ Crepes with Coconut Filling @My Kitchen Snippets

Ingredients for the filling

2 cups of dessicated coconut (or fresh coconut)
1 piece of palm sugar (~200g) – roughly chopped
1/2 cup of water
A pinch of salt

Steps:
1) Put the water in a small pot, bring to boil. Melt palm sugar in the boiling water.
2) Add in dessicated coconut and salt.
3) Stir the filling until the water dry out and well combine. Turn off the heat and set aside to cool.


Ingredients for crepes

1 cup of flour
2 eggs
1/2 cup of coconut milk
1 cup of water
1 tsp of salt
2 tbsp of oil
1 drop of pandan essence

Steps:
1) Mix all the ingredients until well combined. Sift the batter to get rid of any lumps.
2) Heat up a 28cm pan, brush with some oil and wipe off the excess with kitchen towel. Pour 3/4 ladle of batter to the pan, tilt the pan with a circular motion so that the batter coats the surface evenly.  (Note: the amount of mixture needed for each crepe depend on the size of the pan and the desire thickness.)
3) Cook the crepe for about 2 minutes or until the side/bottom is lightly brown. Flip it over and cook for another 20 seconds. Remove from pan and set aside.
4) Repeat step 2) and 3) until all the batter finished.


To Assemble
Put some filling on the crepe and roll it up like a spring roll. Ready to serve.


.

Monday 8 October 2012

Loh Bak (Minced Meat Beancurd Roll)

I made this dish more than a year ago, it was 2011 CNY and we had a small gathering at home. This is my all time favourite when back in Malaysia and also quit a common dish amongst all, one can easily find it in those hawker stalls, breakfast stalls, stalls selling fried economic noodles, restaurants, etc. To be honest, I didn't really cook when I was in Malaysia, my mom will cook and do everything when back at home, hawker stalls are just too handy when studying in KL. I only started to learn cooking and baking after I arrived in the UK. I can't afford to have takeaways everyday, and I haven't able to find one good chinese takeaways for so long I have been staying here. Thinking back, it was unhealthy to have outside food for every meal. Once there is a saying, 'if you want to have outside food, you should never go into their kitchen or visit the place or environment how they prepare your food', this is quite true as you will probably lost your appetite after seeing the real scene. Occasionally there might be one or two mickey mouse chasing around, of course not all hawker center having such condition, some do have improve hygienic level.

Ok, back to the topic. This Loh Bak recipe was adapted from Ohbin's blog. I had cut the amount into half. This was my first attempt and the loh bak turn out really nice, everyone who tried gave thumbs up.

These were the dishes of the night, we also got nice and tasty Lou Sang from Alson and Angie.

Loh Bak (Minced Meat Beancurd Roll)


Loh Bak (Adapted from Ohbin@五香春卷)

Ingredients:
500g pork mince
250g prawn paste
10 shallots (finely chopped)
10-15 water chestnut (finely chopped)
1 large carrot (chopped)
20 cream cracker biscuit (break into small pieces)
2 pcs beancurd sheet

Seasonings:
1 1/2 tsp salt
1 1/2 tbsp light soy sauce
1 tsp chinese five spice powder
1 tsp freshly ground white pepper

Steps:
1) Soak beancurd sheet in water, remove from water when it is soften. Cut into half and set aside.
2) Mix the rest of the ingredients in a mixing bowl, add in seasonings and mix until well combined.
3) Line a piece of beancurd sheet on a flat surface, spoon the mixture onto the sheet and roll up. Repeat until all the mixture finished.
4) Prepare a steamer and steam it for about 5 mins, leave it cool before frying as the steam might make the hot oil splash.
5) Deep fry the beancurd roll until golden brown. Slice and serve.

Wednesday 3 October 2012

Bread and Butter Pudding

Chong bought a loaf of wholemeal bread the other day, he decided to get this as the one we used to buy already sold out. As a result, the loaf has been sitting in the breakfast corner for days and was going slowly. I have tried my best to finish it, either with eggs on toast, with butter and jam/marmite, but we still can't finish the whole loaf. I am not particularly like the taste and texture of this wholemeal bread. I prefer the one I usually have, the Hovis Bread Seed Sensations, the multiseeded bread with brown linseed, roasted sunflower, pumpkin, sunflower, poppy, millet and golden linseed.

The difference between a wholemeal bread and the multiseeded bread

While still struggling to finish the loaf, I recalled the bread and butter pudding recipe from Anncoo Journal which I just read recently. I quickly jot down the recipe and decided to give it a go. I saw this butter pudding few years ago in a Taiwanese show but I couldn't remember how they did it, and couldn't imagine how the taste and texture will be. I am glad I had made it for my brunch, the pudding was tasty and the wholemeal bread was so soft, it was a very filling meal. I had added in more milk so the mixture filled up about three quarter of the baking dish.


Recipe adapted from Bread and Butter Pudding @ Anncoo Journal
 
Ingredients:
2 slices wholemeal bread
Some butter
25g sugar
1 Egg
200ml Milk
1/2 tsp Vanilla extract
A handful of raisins and cranberries

Steps:
1) Preheat oven to 180 degC.
2) Spread butter on the bread and cut them diagonally.
3) Arrange the bread in a baking dish.
4) Beat egg in a bowl, add in the rest of the ingredients and mix well.
5) Pour the mixture into the baking dish. Leave it for 10-15 minutes to allow the bread to absorb the liquid mixture.
6) Put into oven and bake for 20 minutes.

I am submitting this post to Aspiring Bakers #24 (October 2012) : Jellies & Puddings hosted by Charmaine of MiMi Bakery House


Monday 1 October 2012

Baked Mayo Black Pepper Chicken Wings


My brother lived with a German guy when he was studying in the University last year. I just can't stop laughing when my brother told me the funny stories about him. You will be stunned by the way this German guy eat our Malaysian style instant noodles (Maggi Mee). First he just break the noodles and put it into a cup, then add some water and eat it. LOL! I asked my brother how could the instant noodles be eaten in this way, it is not Mamee (one of the snacks which we used to eat when we were little), one might get tummy bugs/diarrhea. The German guy told my brother this is the way he eat it and he has been eating it this way when he was in Germany. -_-"

Then he told me this guy also likes to bake mayo chicken wings and bake the whole batch of wings every time he cook. He would invite my brother to have some if he cannot finish or just put the leftover in the fridge. The next day he just take the chicken wing out of the fridge and eat it cold, I was like 'huh!!' when I heard this. Wouldn't him get tummy bugs by eating this way? According to my brother, the mayo wings is tasty (when it is hot) but he doesn't know how to make it and he has also lost contact with this funny guy.

The wording 'Mayo Chicken Wing' is tempting! I started to google through different blogs and found this recipes in My Kithchen Snippets blog. I like this blog, it just make me feel like I am back to Malaysia. I has been trying out different recipes from this blog and this time I am trying this Mayo Black Pepper wings. The mayo chicken wings turn out really yummy and I would cook it again in the future, for sure.  I have slightly tweak the recipe to a no blend version, the original recipe call to blend the ingredients into paste but I am lazy for the extra washing, I used store bought ginger paste and garlic mayo instead, and use garlic infused olive oil for drizzling. This is my first time of baking this dish, I will try again by using garlic and ginger and blend them into paste

Recipe adapted from Grilled Mayonnaise Black Pepper Wings
Ingredients:
10pcs chicken wings
1 tsp freshly ground black pepper
1 tbsp ginger paste
1 tbsp honey
1 tbsp sugar
3 tbsp of garlic mayonnais
a pinch of salt
garlic infused olive oil for drizzling

Steps:
1)  Wash chicken wings and set aside.
2) Mix all other ingredients in a mixing bowl. Put in the chicken wings and marinate it overnight.
3) Pre-heat the oven to ~200 degC. Line a tray with aluminium foil and drizzle it with some garlic infused olive oil/oil. Place marinated chicken wing on the tray.
4) Bake for about 20 minutes, remove the tray and turn the chicken wings to the other side, bake for another 25 minutes or until it is cooked. Serve warm.

Sunday 30 September 2012

Back to Blog

I haven't been blogging for ages, I am completely ashamed! ! This blog is nearly being forgotten until recently, after reading blogs from bloggers from different part of the world, I then recall I have a blog site. These bloggers' wonderful blogs have inspired me to blog again, there are countless blogs I am reading and has been following silently, their blog/ name will probably appear on my blog in the future as their blogs, cookings, bakings, etc are really Great, I'm Loving it!

After hidden for a while, I would like to introduce you my new family member, my baby boy, Jun, he is now 26 weeks old, going to be 27 weeks soon. Time just flew by so quickly, can't believe I have been on maternity leave for half a year now, will go back to work in a couple of months time. I never thought that I can be a stay at home person for so long, however, most of my time was spent on my baby especially when he was first born. My life has changed after his arrival, as he is my first baby everything were new to me, the feeding, nappy changing, crying, sleep deprivation and many many more..I nearly lost my confident of going out or to socialise with friends during those early months, he will just started to scream whenever he woke up or need a feed or whenever he is not comfy. I then timed myself whenever I go out, I must come back within 2 hours as he need to get feed every 2 hours. I slowly stretch the hour when he grow bigger as his tummy is growing as well. Thing do gets easier and better as he grow, now I can bring him to have coffee with friends, playgroups, swimming, etc.


When he was first born.

He is 26 weeks+ now, how time fly!